Writing documentation is important - it’s the first point of contact between many users and your project, and can be a pivotal moment in whether they decide to adopt your tech or become a contributor.
However, it can be a pain to iterate on documentation, as it is often involves a lot of rapid iteration locally, followed by a push to GitHub where you “just trust” that the author has done a good job of writing content, design, etc.
A really helpful tip here is to use Continuous Integration to build and preview your documentation. This allows you to generate a link to the build docs, which is a much better way of reviewing than looking at the raw text.

Here’s a simple CircleCI configuration that you can use to build documentation with Sphinx and store it as an artifact in the build that you can then preview. To set this up, follow these steps:
Configure CircleCI
First off, you need to configure CircleCI to build your page. This involves creating a file called .circle/config.yml
that Circle will use to decide what to do each time your page is built. You then need to go to the CircleCI
website and tell it to build your site.
Here’s a skeleton configuration that will build the documentation with Sphinx:
version: 2
jobs:
  # Define a "build_docs" job to be run with Circle
  build_docs:
    # This is the base environment that Circle will use
    docker:
      - image: circleci/python:3.6-stretch
    steps:
      # Get our data and merge with upstream
      - run: sudo apt-get update
      - checkout
      # Update our path
      - run: echo "export PATH=~/.local/bin:$PATH" >> $BASH_ENV
      # Restore cached files to speed things up
      - restore_cache:
          keys:
            - cache-pip
      # Install the packages needed to build our documentation
      # This will depend on your particular package!
      - run: pip install --user sphinx_rtd_theme sphinx pytest memory_profiler recommonmark sphinx_copybutton jupyterhub
      # Cache some files for a speedup in subsequent builds
      - save_cache:
          key: cache-pip
          paths:
            - ~/.cache/pip
      # Build the docs
      - run:
          name: Build docs to store
          command: |
            cd doc
            make html
      # Tell Circle to store the documentation output in a folder that we can access later
      - store_artifacts:
          path: doc/_build/html/
          destination: html

# Tell CircleCI to use this workflow when it builds the site
workflows:
  version: 2
  default:
    jobs:
      - build_docs
See the comments above for what each step does.
Tell CircleCI to build Pull Requests for your repository
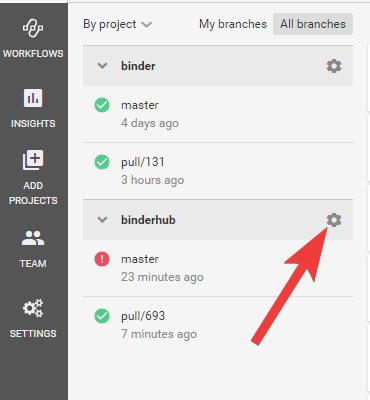
Because we’re doing this in order to preview changes to the documentation in a Pull Request, we now need to tell CircleCI to run builds on PRs to your repo. To do so, go to the CircleCI UI, click on “Jobs”, then click your project name, then click the settings button here:

In the next page, click on Advanced Settings, and finally switch on Build forked pull requests.
Now, Circle will build against the PRs of your repository.
Make a Pull Request
Now it’s time to test things out. Make a Pull Request for your repository. GitHub should automatically detect a CircleCI configuration, and run the job with the configuration you’ve specified.
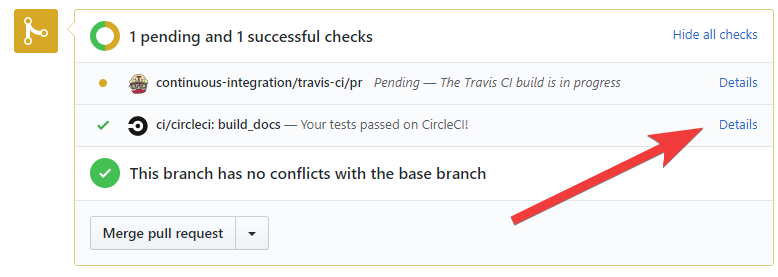
Once the documentation is built (or if it fails) you can click on the CircleCI link from the GitHub UI in order to see what happened.

View your artifacts
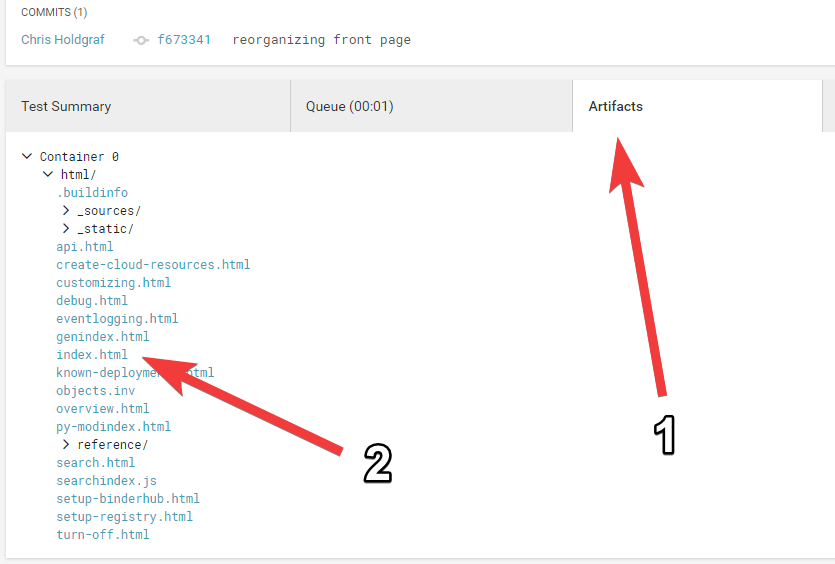
You should be taken to a page that shows a summary of the recent CircleCI build for this PR.
If your documentation successfully built (and if you’ve told Sphinx to put the built site in doc/_build/) then
you can now click on the Artifacts tab. You should see a drop-down list of artifacts that CircleCI has
stored for you. Click on index.html and you should see a preview of your built documentation:

And that’s it! Obviously you can configure CircleCI in many more ways, but this is just a barebones example to get you started. I hope you’ve found it useful!